Wednesday 29 June 2016

Loose Parts Play - An Introduction

Have you ever heard of 'loose parts play'? I first came across this term when a member of a private Facebook group that I belong to posted a photo of a 'loose parts tray'. I didn't really know what it was then and did not bother to find out more. As I was reading up on the Reggio Emilia approach to early childhood education, I came across this term again. What I read inspired me to find out more. After some research I was totally won over by the many benefits loose parts play have for the development of young children (not to mention how friendly it is to my wallet since loose parts are largely free or low-cost materials). It was like an eye-opener for me, and resulted in a fresh approach to providing opportunities for play and exploration. I became more conscious of collecting 'loose parts' and place a higher value on them than on the relatively more expensive manufactured commercial toys so prevalent in our culture.

"The Theory of Loose Parts" was credited to Simon Nicholson, an architect, who in in 1971 wrote an article entitled "How not to cheat children: The Theory of Loose Parts." According to Nicholson, "In any environment, both the degree of inventiveness and creativity, and the possibility of discovery, are directly proportional to the number and kind of variables in it." In other words, when children are presented with a wide range of materials that have no defined purpose, they will be more inventive in their play and would manipulate and use the materials in as many ways as their imagination can devise.

So what exactly are 'loose parts'? Loose parts are open-ended materials that can be moved, carried, combined, redesigned, lined up, taken apart and put back together in multiple ways. They can be used alone or combined with other materials. Loose parts can be:

- recycled or upcycled materials, such as cardboard boxes, cardboard tubes, plastic bottles, bottle caps and egg cartons.

- found in nature, such as leaves, flowers, seed pods, sticks, pebbles, seashells and rocks.

- store-bought, such as drinking straws, craft sticks, pom-poms, pipe cleaners, marbles, beads and buttons.

Here are pictures of some of the loose parts I have collected for use in our home preschool:


In the above picture, there are seashells, rocks, transparent glass gems, marbles, buttons, beads, decorative toothpicks, cotton buds, pom-poms, craft sticks, wooden pegs, wooden blocks and discs, coloured shape blocks, pipe cleaners, disposable chopsticks, drinking straws, googly eyes and yarn.


The picture above shows loose parts collected from recyclable items. There are Styrofoam pieces, bubble wrap, aluminium cans, empty plastic containers, cardboard tubes, bottle caps, cork, egg carton and fabric scraps.

Loose parts offer infinite play possibilities. They invite children to use their imagination to create, design, construct, experiment, and explore various ways of making things or inventing play. It is spontaneous and has no specific set of instructions; outcomes will vary from child to child. In fact, depending on the interests of the child and stage of development the child is at, the same loose parts will be used differently at various points. This means loose parts will continually engage children as they move to higher levels of play according to their maturity levels.

I would like to share one of my very first encounters with the outcome of introducing loose parts play to David. I had been collecting bottle caps for some time. One day, he saw the bag of bottle caps that I have and asked to play with them. I gave him the bottle caps and went on to do something else. After some time he came to me and said,"Mummy, see... I made a fan." I looked at what he was pointing at and was a bit taken aback.


Can you see the similarity? I have since learned not to underestimate what children can do when they are presented with loose parts to play.

For children who are accustomed to playing with 'fixed toys' and electronic devices, it may take a while for them to take to loose parts. Children who are exposed to large chinks of TV and i-Pad time are especially less inclined to want to exchange the visual stimulation they can get for such humble play that requires them to think and use their hands. If this describes your child, don't give up on loose parts play just yet. Try introducing this type of play regularly and show interest in what they are doing to encourage them. Children are curious and creative by nature. Let us be more intentional in what we present to our children for play so as to help them exercise their creativity, something that the Lord has given to mankind, his image-bearers. I will write more about how loose parts play can be incorporated in the home in future posts, God willing.

For more information and ideas on loose parts play, you may wish to follow my 'Loose Parts Play' board on Pinterest:

Monday 27 June 2016

Free Creation-cum-Alphabet Resource

I am teaching David the first two questions from the Toddler's Catechism that my church uses for parents to instruct their children.

Question 1: Who made you?
Answer: God

Question 2: What else did God make?
Answer: All things.

I was very glad to discover this free resource from 'Bible Fun for Kids' that helps to reinforce the lesson on creation. This free printable pack is called "God Made It! A to Z". As the name suggests, this is a alphabet learning resource that focuses on God's creation. For every letter of the alphabet, there are pictures of things that God created that begin with that particular letter.


I wrote down the words for the pictures on the back of each card. This is to expose David to the words in addition to the pictures and let him see that all the words have the same beginning letter.

There are also colouring pages available from this resource. I used some of them to make alphabet lapbooks with David.


This free printable pack is available at the following link: http://www.biblefunforkids.com/2013/01/god-made-it-to-z-for-preschool.html

I hope you find it useful too!


Thursday 23 June 2016

Kitchen Science Fun - Making Art with Vinegar and Baking Soda

Mixing vinegar and baking soda is one of the classic Kitchen Science experiments that never fails to fascinate children. In this activity I decided to colour the vinegar with food colouring for an 'artistic' effect in addition to the fizzing fun. The use of squirt bottles also makes this a great activity to practise fine motor skills.


Materials used:
- a tray lined with baking soda
- diluted vinegar in squirt bottles (one part vinegar to one part water)
- food colouring (I chose the primary colours red, yellow and blue to allow for the possibility of creating secondary colours.)


David started with the blue vinegar solution. He squeezed the bottle and squirted the blue solution onto the baking soda. The intense bubbling and fizzy reaction got him all excited. "Mummy! See! Bubbles! Bubbles!"


He then added bits of red and then yellow. We were beginning to see the effects of colour mixing.


Red was the last bottle to be used up.


The picture above shows the final product. Don't you think it's a nice piece of art? We can observe the results of colour mixing and thus creation of the secondary colours, particularly green and purple. Throughout the activity we talked about the colours he used, how the colours changed when they mixed, and why there were so many bubbles. I just explained there was air in the bubbles trying to escape. That should suffice for this stage, I think. I know he can't fully understand the science behind this yet, how that acids combine with bases to form a chemical reaction. Nevertheless, I believe exposure to sensory and visual observations of such experiments does have benefits for young children. Not only is it a 'fun' thing that excites them and stirs in them a sense of wonder, it also helps build observational and language skills. To me, it is largely about exposing them to the wonders of science, which ultimately points to the wisdom and power of our Almighty Creator.


Tuesday 14 June 2016

Fun with Letter of the Week - Letter L

We did quite a number of hands-on activities for Letter L, which include lemon printing, making a paper plate ladybird, a lion mask, a homemade lava lamp, and lacing letter L with shoelace. I will share three of them here.


Lemon Printing

I introduced the word 'lemon' and let David hold a lemon in his hand. I asked him about its colour and texture. Next, I cut it into half, then asked him to smell it and tell me whether he liked the smell. I squeezed out some of the juice (so the lemon prints to be produced later can have a more defined outline) and let him taste a bit of it. I explained to him that lemons taste sour but have a fragrant smell.

In the steps above I had adopted a Montessori approach in trying to engage David by letting him learn through his sense of sight, touch, smell, taste and hearing. There is an emphasis on sensory learning in Montessori education as one of the underlying beliefs is that children learn more by touching, seeing, smelling and tasting than just by listening. I personally feel that this is a reasonable and sensible approach to teaching young children. God has given us the five senses to experience and explore His creation. Without any of these senses we would feel handicapped in some ways in life. Thank God for giving us our senses to enjoy what He has created and to function normally in this world!

These are the materials I prepared to do this activity:
- a lemon, cut into half and partially juiced.
- a muffin tray with two parts containing different colours. I used green and yellow watercolours. You may use other receptacles for the paints as long as the base of the half lemon can fit nicely into it.
- a piece of drawing paper

And the fun can begin!


David was quite fascinated by the process of dipping the half lemon into paint and stamping it onto paper. He took some time to get used to gripping the lemon firmly and was rather deliberate in his actions for his first piece of work. When he was done he immediately asked for another piece of paper to continue the activity. He became more proficient at it and was stamping faster and in a more orderly manner on his second piece of work.


In between the printing process, he would stop and examine the half lemons as in the photo below. Hmm... I wonder what was going through his little mind?


When he was done, he spent some time playing with the half lemons. Throughout the whole activity, the kitchen was filled with the sweet fragrance of lemon. What a delightful bonus to our letter of the week activity!

Make a Lava Lamp

Have you ever felt the mesmerizing effects of watching a lava lamp? The repeated rising, sinking and morphing of large coloured bubbles in what seems to be extremely viscous liquid. Since we were doing the letter L, I thought it would be cool to do a lava lamp experiment at home!

The homemade lava lamps that I found online mostly require the use of Alka Seltzer tablets, which are not commonly found in Singapore. As I searched further I realised salt can be used in place of Alka Seltzer.

These are the steps to making a 'lava lamp' at home:

1. Fill a glass bottle about two-thirds full with water.
2. Drop a a few drops of food colouring in and mix. (Lighter colours are better as the effects would be clearer.)
3. Fill the rest of the bottle with vegetable oil, leaving about half an inch at the top of the bottle.
4. The most fun part is this step: Scoop some salt and pour it into the bottle. Observe and be amazed!


David watched the the bubbling effect intensely and the moment it stopped, he immediately added another scoop of salt to see the whole process again. I lost count of the number of times he added salt to the bottle. When I said it was time to stop, he burst into tears :(  He stopped only after I managed to distract him with some other activity. That's not quite a happy ending, but it showed how much the activity meant to him. Though he was too young to understand the science behind the whole experiment, his observation and involvement in the activity stirred in him a sense of wonder and curiosity. I think that alone means a lot to the development of a child.


Make a Lion Mask

Another activity we did for letter L was to make a lion mask. I got this idea from the website 'Crafting The Word Of God'. You may go to this link for the instructions and template: https://craftingthewordofgod.com/2013/03/19/daniel-in-the-lions-den/


The first step was to colour a paper plate yellow. I gave him a sponge brush and he used it to paint the plate with yellow watercolour.


Next, he used the same sponge brush and colour to paint the printed lion's face template yellow.


When he was done, I cut out the eyes for him and he used a glue stick to apply glue to the plate (after it had dried). He pasted the lion's face onto the plate. I helped him cut out the "mane" from the given template and he helped to glue them onto the rim of the plate.


Ta-da! Happy playing!

And that concludes my lengthy write-up of our activities for Letter L!

Monday 13 June 2016

Fine Motor Activity - Threading with Cereal Loops

Before children are able to hold a pencil properly to write, they need to develop the necessary fine motor skills. I try to incorporate some fine motor activities in our homeschool to work those little muscles in David's hands to prepare him for writing. Fine motor skills are important not only for writing, they are essential for so many activities in our daily lives! We need fine motor skills to use a pair of scissors, to cut fruits and vegetables, to button and unbutton our shirts, to brush our teeth, tie our shoelaces etc.. Some vocations, like surgeons, chemists, craftsmen and artists require very well-developed fine motor skills. As I let David engage in fine motor play, I would like to think of it as preparing him for life and usefulness in his future calling.

A simple fine motor activity that can be done with young children is threading with cereal loops.


I used some freshly-made homemade play dough as the base and inserted a strip of spaghetti into it. I poured some fruit loops (you can use any circular cereals with holes, like Cheerios) into a bowl and showed David how to thread one piece through the spaghetti. He caught on very quickly and was soon busy threading the spaghetti with fruit loops. It was fun watching him. He really enjoyed the activity and was fully engaged in it.

His well-deserved snack (what else but fruit loops?) was waiting for him right after he was done threading (Yummy!). If you are concerned about feeding your child the piece of cereal that touched the play dough, just leave that one out. I ate that up as my batch of play dough was freshly made and the ingredients were all food-grade :)

Friday 10 June 2016

Fun with Letter 'I' - Ice Painting

For every letter of the week, I would plan for some hands-on activities to go with it. I believe children learn best through play and as they engage their senses. As the saying goes,"Tell me and I will forget. Show me and I will remember. Involve me and I will learn."

For Letter I, I introduced the word 'ice' and we did 'ice painting'. I filled a jelly tray with water, then added different colours into each compartment to get coloured water (you can use water colours or food colouring). Next, I covered the tray with cling wrap. Then I inserted one craft stick into each compartment by gently poking through the cling wrap with one end of the craft stick. The cling wrap serves as a support to hold the craft sticks in an upright position. When the tray was ready I put it into the freezer. This was how the tray looked like after the water had frozen:


To start painting with the coloured ice, I removed the cling wrap and waited for a few minutes for the ice to thaw a bit. Doing so makes it easier to remove the ice from the tray. Remember to cover your working place with newspaper to protect the surface and contain the mess. When you can easily remove the ice sticks the fun can begin!


As I had frozen the coloured water in a jelly tray instead of a regular ice cube tray, David was able to stamp some nice prints on the paper first before gliding the ice across the paper.


The photo above was his first piece of work. It is my favourite piece as the ice had just started to thaw and the prints that he stamped were thus more defined in outline. He glided the top with blue ice for sky and the bottom with green ice for grass. When the ice thawed further, he started his second piece of work, this time gliding different colours randomly across the paper.


He then decided it was more fun stamping prints with the ice and asked for more paper to do just that :)


As the ice had already melted quite substantially, the prints he made the second time round were not as defined. Nevertheless his work was still pleasant for me to behold!


David had great fun creating pictures with coloured ice in this letter of the week activity. I would encourage anyone with young children to have a go at it too!


Saturday 4 June 2016

Teaching the Alphabet - Making Alphabet Lapbooks

I have been making alphabet lapbooks with David as we work through letters of the alphabet week by week. Lapbooking is a popular hands-on and visual learning tool among homeschoolers. What exactly is a lapbook? According to Lapbooking 101, a lapbook is "a project book or file folder, laid out in a creative manner, that fits in the child's lap." Every lapbook has its particular theme. One can make a Butterflies Lapbook, an Ocean Lapbook, a Water Cycle Lapbbok, a Lapbook on Ancient Egypt and so on.

Lapbooks can be made and organised in many different ways. Check out the link below for a more detailed write-up on lapbooks. This link provides useful information on how to make a lapbook, including directions on how to make different kinds of mini-books (to be mounted on the lapbook), links to free templates, and several lapbook samples: http://hubpages.com/education/lapbooking

As David was still young, the alphabet lapbooks we made are very simple. I involved him in colouring and pasting, but I did all the printing and cutting. Nevertheless I didn't have to spend too much time making the lapbooks as I made use of free templates provided by Homeschool Share:
http://www.homeschoolshare.com/alphabet_notebook.php

Other than the materials found in the templates, I tried to incorporate some Bible-related images (such as dove, eagle and lamb) so David would be familiar with them when we refer to Bible verses associated with them. I also like to include some songs associated with the letter so we can sing together when we read the lapbook. This is something David enjoys very much!

Here are some samples of our alphabet lapbooks:

Letter G:


Letter H:


Letter J:


Letter L:


The alphabet lapbooks we made together will serve to preserve precious memories of our learning together. I look forward to making unit study lapbooks with David soon when we embark on thematic learning!

Thursday 2 June 2016

Teaching the Alphabet - Free Online Resources that I Use

I started teaching David the alphabet systematically when he was about two and a half years old, using the 'Letter of the Week' approach. Before that he already had some exposure to letters from reading alphabet books and singing the alphabet song. The many books we read together certainly contributed to his awareness of print and how letters of the alphabet look. We started from A and worked our way to Z, though I know some people advocate teaching them in a different order so they can start blending words. My purpose was to let David have a gentle introduction to the alphabet and learn the letters through play and hands-on activities as far as possible. I planned to introduce letter sounds after he knows the alphabet in both upper and lower case. (When I'm writing this post, David already knew all the letters of the alphabet as well as their sounds. It was totally unexpected that he managed to learn all the letter sounds in three weeks. But that will be a separate post...)

In this post, I would like to introduce the free online resources that I use for teaching the alphabet. You can pay for these resources if you want the convenience of having them in a bundle, but I try to keep the cost of homeschooling as low as possible.

For every letter of the alphabet, I would print out two mini-books from The Measured Mom (a wonderful website that provides tools and ideas for teaching reading). One is a simple alphabet book with photographs:


These simple alphabet books have colourful photographs that appeal to young children. The letter is presented clearly in both upper and lowercase for each picture. After reading a few times, David is able to 'read' the books on his own. He also likes to trace the letters using his fingers, which I thought was a great pre-writing activity. You can download the books for free from this link:

http://www.themeasuredmom.com/simple-alphabet-books-babies-toddlers-preschoolers/


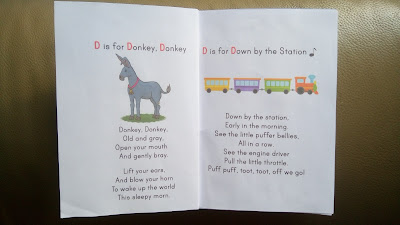
The other mini-book that I use is a 'little letter book' with songs and rhymes that go with a specific letter:


Each book has six songs/rhymes for a particular letter of the alphabet. David especially enjoys singing from these books. He has a greater sense of rhyme and rhythm after reading these books, which is great because rhyming is an important pre-reading skill. (Check out this link for why rhyming is important: http://www.themeasuredmom.com/why-is-rhyming-important/)

The books of rhymes and songs can be downloaded for free at this link:
http://www.themeasuredmom.com/free-letter-books/


Another great website to go to for teaching the alphabet is This Reading Mama. This website has an alphabet series called Learning the Alphabet. The activities in this series were designed to make learning the alphabet hands-on, playful and interactive. You can download the free ABC Printable Pack at this link: http://thisreadingmama.com/free-abc-printable-packs/. I do not use all the activities though, as they are repetitive in nature.

The Learning the Alphabet series is a 'prequel' to Reading the Alphabet - a free Pre-K reading curriculum designed for young children who already know their letters and letter sounds. I'll be using this free curriculum to teach David very soon. I certainly hope he'll enjoy it!


Wednesday 1 June 2016

Welcome to my Blog!

Hi! Welcome to Joyful Learning Home Preschool! My name is Ruth and I'm from Singapore, a small city state in Southeast Asia. I'm a Christian SAHM to three boys (ages 15, 10 and one turning 3). I homeschooled my older two for preschool and kindergarten and have always regretted not keeping a record of what I did with them during those years. Now that I am teaching my youngest at home, I thought of creating a blog to preserve memories of our homeschool days. I'm an eclectic homeschooler, so you will find elements of traditional, classical, Charlotte Mason, Reggio and Montessori approaches in my homeschool. The early years are vital to a child's spiritual and character development. It is my desire that my children will know God and love His Word from an early age. At the same time, I want them to be able to find great joy exploring this world that God created. Whether it be the systems in languages, the laws of mathematics and physics, the beauty of nature and the arts, or the events in world history, the Lord is sovereign over all and in them all. It is my prayer that by God's grace, they may develop their God-given abilities and gifts to the end of knowing Him, enjoying Him, and glorifying Him in their earthly callings. May the Lord use my feeble attempts to teach my children for His own glory.